
Patching Firmware Secure Boot on DELL G115 Through Off-chip Extraction

This research and article is by RedCrow's Hardware Hacker Matt.
Objective:
The goal of this project is to get a computer that's locked down with its BIOS Secure Boot Mode enabled and disable it through firmware modification using an on-chip firmware extraction.
Tools -
For this project we'll need the following tools:
- CH341A Programmer
- SPI Flash 1.8V Adapter
- SOP8-to-DIP8 Pin Adapter
- SOIC8 Chip Clip
First we needed to identify the chip on the motherboard that could contain the firmware BIOS settings. For this Dell G15 5515 RE laptop initially there's only two possible chips, the GigaDevice GD25LR128D Dual/Quad Serial Flash, and the Winbond W25Q16JW Serial Flash Memory.
However, the GigaDevice GD25LR128D has a capacity of 16 Mega Bytes, while the Winbond W25Q16JW is only 16 Mega Bits, which makes it the most likely for storing BIOS settings.
Setting up the Tools/Software
For connecting to the chip, a XGecu T48 Programmer was the first choice but after looking at the supported chip device list, the GD25LR128D chip was not presently supported, so the CH341A Programmer proved to be a better option, plugged into a Raspberry Pi 4.
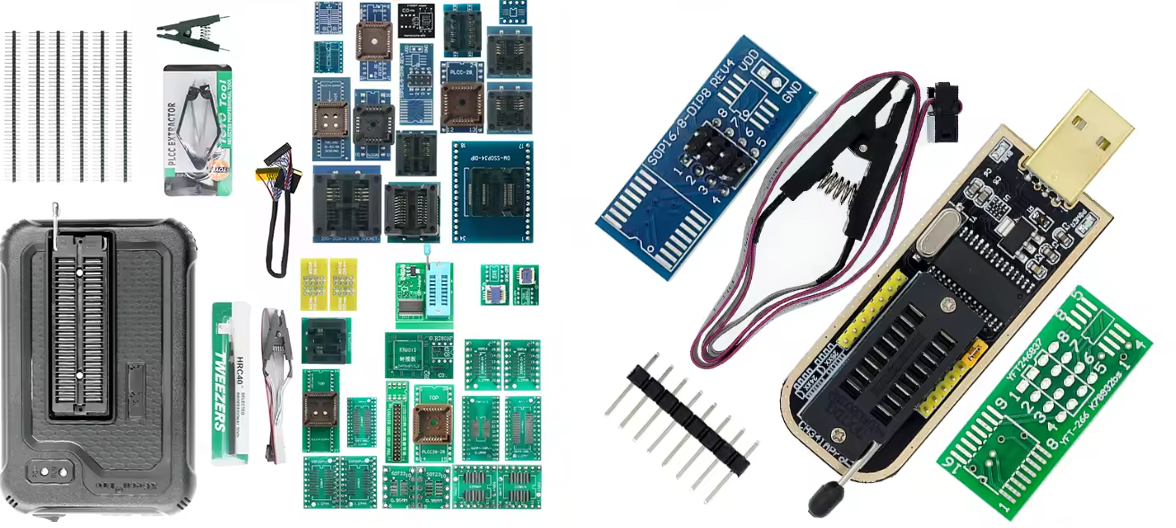
Since the chip only operates on a 1.8 Volt DC Power Supply, a SPI Flash 1.8V Adapter is needed attached to the top of the Programmer. Then for connecting to the chip, a SOIC8 Chip clip and a SOP8-to-DIP8 pin adapter for mounting the clip correctly into the 1.8V Adapter atop the CH341A Programmer.
Pulling the Firmware from Chip
First using `flashrom` with the `-p`, and `-r`, options to read from the chip in spi mode and save it in a binary file.
sudo flashrom -p ch341a_spi -r gd25_dump.bin
Then confirm that the device storage size is 16MB.1
root@RPi:~ ls -lh gd25_dump.bin
-rw-r--r-- 1 spectra spectra 16M Jul 23 20:04 gd25_dump_copy.bin
root@RPi:~ $
Next runming `strings` on it to see if there's any readable ASCII text or UEFI/BIOS strings inside the file.
The output is quite long but if we check the entire string output, we can spot some modules inside that prove it contains the BIOS system firmware, such as: EFI, DXE, SMM, and PE32 are all UEFI binary sections. As well as, InsydeFlash, Setup, Boot manager, and PlatformInit are BIOS-related modules.
This confirms that the BIOS settings are present in this chip.
Checking the Firmware File Structure
Running `Dell BIOS Tools.V21 Service Tag Extractor` will show weather or not any Dell-related tags exist in the BIOS dump, as well as `binwalk` to see the file structure of the firmware.
The program has the capability to read through and patch certain bytes inside the firmware, however Dell's unlocker tool doesn't support AMD-based boards and only checks for Intel signatures. So instead it'll be necessary to go through manually and find which firmware blocks contain the desired SecureBoot bytes.
Service Tag `HISTORY` found 11 times.
- BIOS region offset: `0x00EB5BB0 – 0x00EC2873`.

Then we binwalk the dump:
binwalk gd25_dump.bin

Binwalk'ing the file shows the dump is valid and contains UEFI-level configuration, including secure boot policies and password protections.
The exact locations of the SecureBoot settings in firmware are still unknown, so `UEFITool` will be used to search the system file tree and find any existing UEFI-variables related to SecureBoot.
Analyzing the Firmware Data
Now that we know for certain the chip contains the BIOS-settings, we'll create a backup copy of the file and attempt to analyze different sections of the firmware to find the SecureBoot flags.
Searching through UEFITool with `ctrl + F` results in variable entries for both SecureBoot, and SecureBootEnforce.
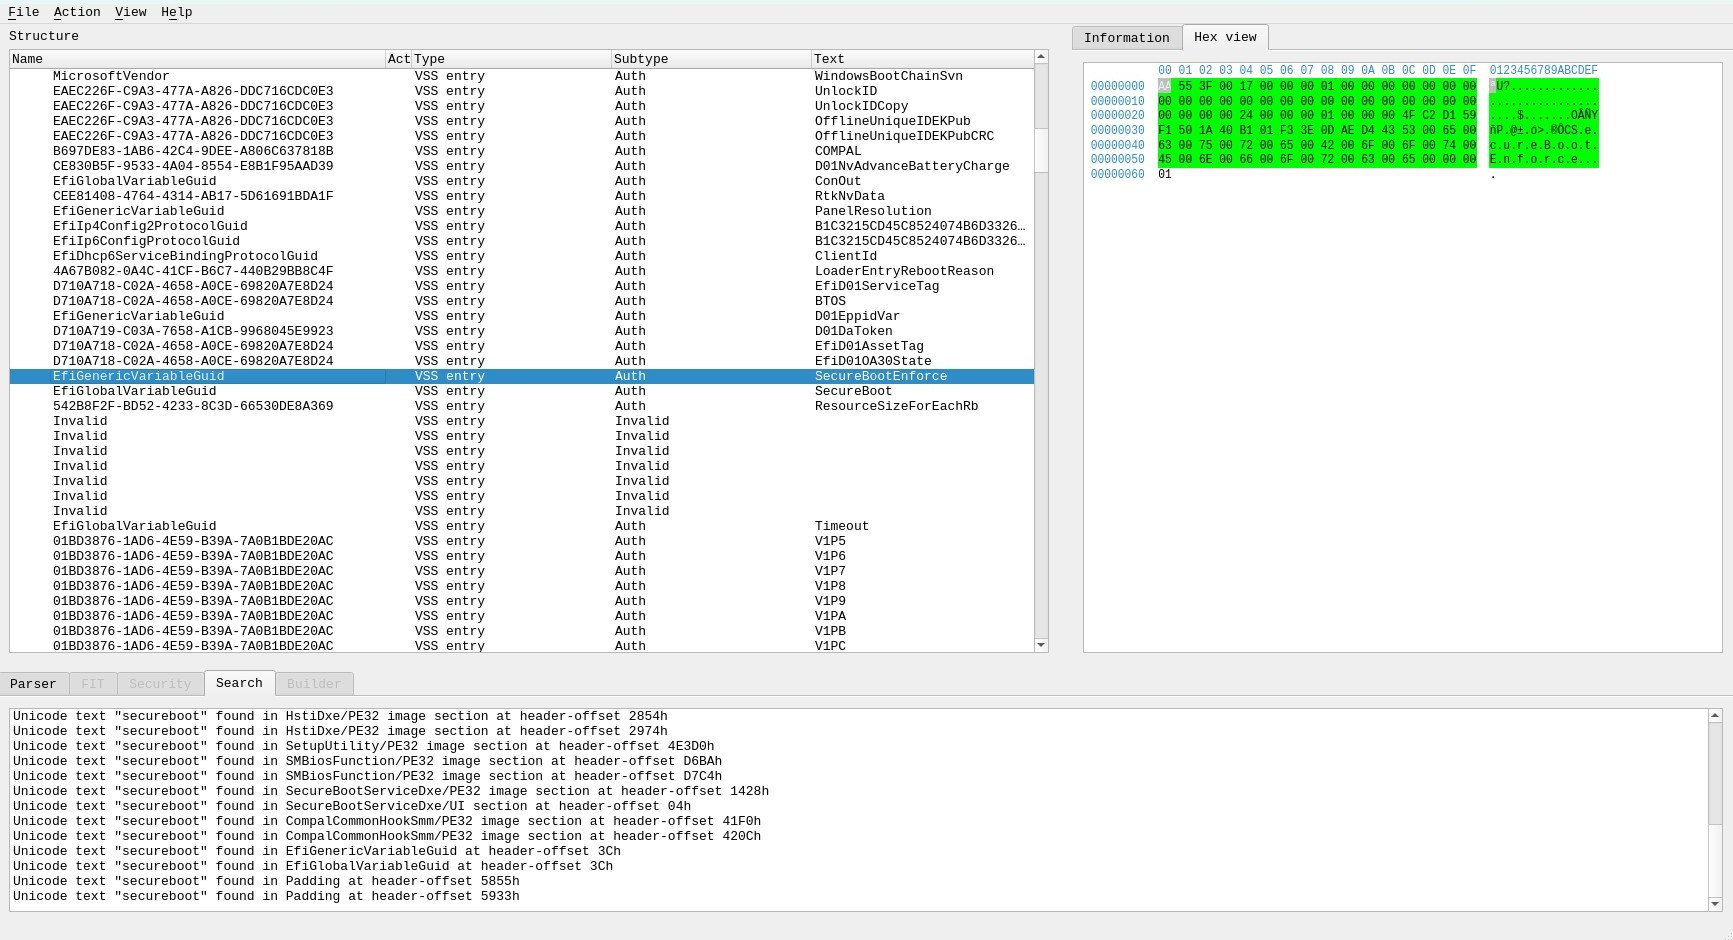
SecureBoot being enabled is dependent on other variables states existing inside the BIOS NVRAM of the flash chip.Policy Key (PK) is a BIOS variable that tells the machine its in User/Deployed mode and SecureBoot is considered active.
The first variable to target and disable is SetupMode ( changing bit 1 (ON), to 0 (OFF) ) ,this will switch the system to permit changes to Policy Key and SecureBoot allow/deny lists.
This also includes KEK ( Key-Exchange Key ), which is used to verify and authorize updates to SecureBoot's allow/deny lists (dn/dbx).
Modifying the Firmware Data
For searching through and removing the variable 1Bit (ON), state's in the UEFI firmware, an automated Python Script will search for the variable names found by UEFITool and print their associated `Address offsets` and display weather or not thier state byte is still active.Then using a Hex Editor like `Hexedit` to search for their respective addresses and erase those state bytes. Turn the ON Bit from 1, to 0, OFF.
With this a table can be created based on the necessary Variables and their Offsets.
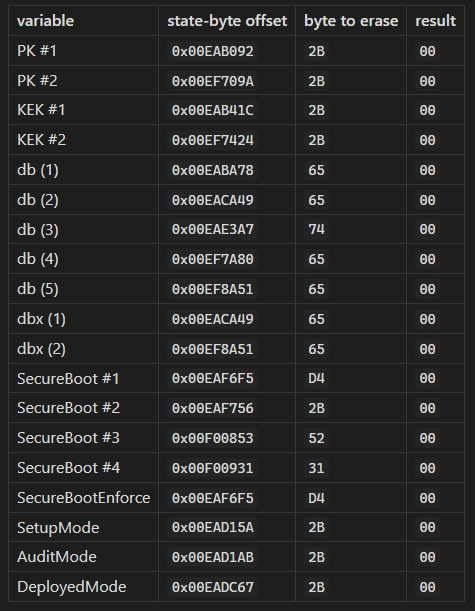
Now opening up the firmware dump file with hexedit, use `Ctrl+g` to jump to the associated `Address Offsets` and zero the variables at their location.
Re-flashing the Firmware to Chip
To prepare for re-flashing, compare the copy of the original firmware binary file we made with our patched firmware version to see if it matches our expected byte difference after the changes with `flashrom`.
sudo flashrom -r read_test.bin -p ch341a_spi
Which results in the expected byte difference of 15380571, and line difference of 24700.
Now that we know the read on the chip is working, lets go ahead with our final step of re-flashing the patched firmware back onto the chip.
Using the CH341A in SPI mode again, automatically erase, program, read back, and verify the whole 16 MiB image.
Once the `-w` option finishes showing a _“VERIFIED”_ message, the chip will be fully re-flashed.
#1 Program (erase → write → verify, all in one)
sudo flashrom -p ch341a_spi -w firmware_mod.bin
#2 Optional explicit re-verify afterwards
sudo flashrom -p ch341a_spi -v firmware_mod.bin
Conclusion
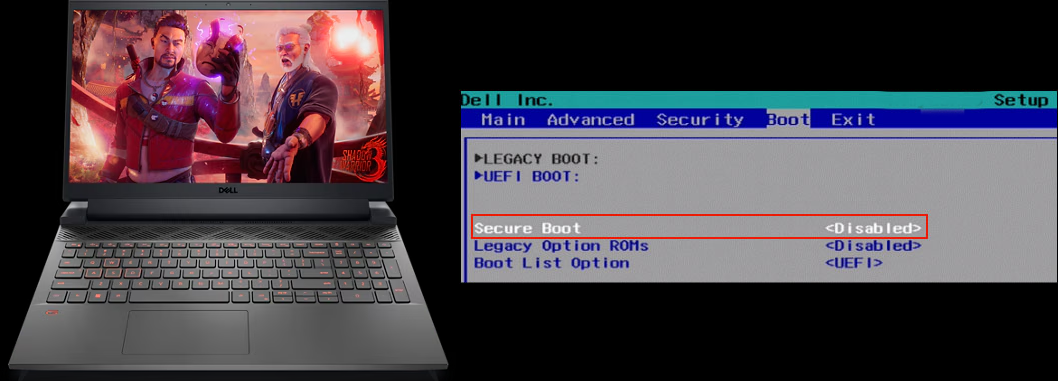
Now lastly to re-assemble the computer back together and confirm UEFI `SecureBoot` is off.
The `SecureBoot` flag also appears to have removed the permission for editing the BIOS Password as well, so we can go ahead and change it to nothing so we don't have a password prompt every time when booting up the computer.
This proves that a Firmware Modification through an off-chip extraction was able to successfully disable the BIOS Secure Boot on this device.
Matt